Tuesday, December 31, 2013

Make It Monday # 146 Angled Backgrounds

Talk about using up my scrap paper stash! Woo Hoo!! Ashley showed us how to make angled backgrounds without a die. This was a great challenge for using all those paper scraps lying around that you don't have the heart to throw away. You can find the challenge at Nichole's BLOG.

 I really needed to make a birthday card for one of my big brothers since his birthday is January 2nd. I wish I had a picture of him with my Mom way back in '61 when he was baby of the year. Believe it or not, no-one was born on the 1st at Cape Fear Valley Hospital in Fayetteville, NC!    Anyway, on to the card:
 This next picture, I tried to get a close up of the washi tape I added, it says "made with love".
I guess I need to invest in a new lens for close-ups one of these days! That's the best I could do.

PTI Supplies: Birthday die, Dark Chocolate CS,
and" Happy" stamp from Wreath for All Seasons.

Happy New Year to ALL!!

 Happy Birthday to my dear brother Jeff too!
TTFN,  Jen

Sunday, December 29, 2013

MIM: A La Carte Take Two

The second card I did I used MIM # 139 Stamping Square Frames and here is my card:

                                               Happy New Year to all!!

Make It Monday A La Carte

A year in review for Make It Monday this week over at Papertrey Inks' Blog. I chose to do MIM # 134 Repeat and Lift.  You stamp repeatedly but slightly move the stamp so you get a blurred image and then match it up with the die. A very unique look, and here it is:


The second card I did was a quick Thank You card using the technique from MIM # 139 Stamping Square Frames. I loved this technique to frame a sentiment, or anything for that matter.
That's all for now. I hope to play along again this week.  Until then, Happy New Year!!

Thursday, December 26, 2013

December 2013 Papertrey BLOG HOP

Blog-hop-logo
The challenge was to tie it up with string. I made a wine bottle tag and
tied it to the bottle with some glittery sparkly string. You can see Jade(our

 little Boston Terrier) peeking out from underneath the tag. This
bottle of wine we received as a gift from Fetch n Catch, our
doggy daycare that Jade and Scarlett love!!!! I have another bottle
of wine that I am giving but I had to take the picture on this one.

Have fun hopping! Hope everyone had a happy holiday yesterday.

Saturday, December 21, 2013

Last minute Christmas trees with chocolate kisses, rolos and peanut butter cups

 I just glued them together with a hot glue gun. Pretty simple. Then if you want to add a glittery pipe cleaner for garland it adds a little more pazazz to the tree.  I just wrapped it around tight, didn't even secure it because the wire holds it in place, unless you really don't want it to move at all.
 Some stores even carry the combo bags of candy with pb cups and rolos together and I bought some kisses  in a separate bag.

                                             Have fun and Happy Holidays to all!  

Tuesday, December 17, 2013

White Chocolate Covered Star Pretzels-Oh My!


These were so simple to make and I loved the way they turned out. The hardest part was finding the shaped pretzels but I got these at Sam's Club. They come in trees, stars and bells.  I picked through them to find the stars but I ended up doing a little of each shape. I just liked the stars best with the silver shimmer sugar.

 I then melted white ghirardelli chocolate in my make shift double boiler. It was quite thick so I added a little coconut oil to thin in out. Dipped and coated my pretzels and topped them with silver sugar. I don't think they will make it to the cookie trays because the little (and big) elves around here keep sneaking them.  They ARE good!

What do you like to make as a special treat around the Holidays??

Monday, November 25, 2013

November 2013 Blog Hop

Blog-hop-logo
The-Challenge

November-Blog-Hop-Challenge

I wasn't going to participate today because I had quite a few things to do but after looking at a few  houses,
 I was inspired.  I wanted to use what I had instead of  the pattern Nichole gave us.


So, this is what I ended up with:   Not a great picture but you get the idea. It's not as dark and gloomy as it looks.  I used the Mat Stack 1 die and the favor it box. I also used the Homemade Stamp set. The snow is flower soft.  A blingy wreath above the door with tiny pearl knobs. Stickles in the windows.
I also used a Tim Holtz texture fades folder for some extra texture for the roof.  Any other questions, please ask!


 I couldn't help but post this picture of Scarlett and Jade sun bathing this morning. It's so nice when we do get the sun in Buffalo, I wanted to snuggle up and bask in the sun with them!


Thursday, November 21, 2013

Curried Butternut Squash Soup and Bale of hay Blessings!

I don't know about you but as soon as the cold weather hits, I want soup!!  This is one of my all time favorites. I found the recipe here so I cannot take the credit for it. It is absolutely delicious!  I make it at least a dozen times over the winter months. It definitely fits in the comfort food category. I just finished my 3rd bowl today and I threw some tortellini in this time- scrumptous!

The original recipe calls for cream which I never use. Sometimes I substitute milk and sometimes nothing at all, depending on the size of the squash and thickness. It really doesn't need the extra richness.

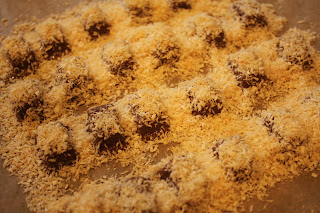
So, on to other "crafty fun stuff", in the kitchen.  I wanted to make little bales of hay around Halloween but just never got to them. Since it's not quite Thanksgiving yet, I decided why not give it a shot and we can use them as little teacher gifts.
 I started with Unsweetened Organic Coconut and toasted it slowly in my toaster oven as I did not want it to burn. It gets brown quickly when the temp is high. I started at 275 and just kept watching it and moving it around the pan with my spatula. It finally got toasted to where I thought it looked like straw.
 I then took some mini kit kats and put those in the oven about 10 seconds. They even started to lose shape so the next time I would put them in and WATCH them, then pull them out as soon as they are glossy.
  I doused each with the toasted coconut and put them in the fridge to firm back up. Easy Peasy!

 I had some jelly pumpkins and my daughter let me borrow her turkey button because I was complaining telling her that I didn't have a turkey for my picture. I'm going to bag these up and make up some tags and we'll have a little treat for teachers, coaches, friends....and whoever else we can think of for some Bales of Blessings!  


Hope you all enjoyed. Still working on organization in the kitchen but I hope to be back with some pictures soon.

 Happy Thanksgiving!

Jen

Friday, November 8, 2013

Kitchen Reveal

Okay, I know you've all been waiting forever! Believe me, I know it seems like it's been
 F-O-R-E-V-E-R!!  The kitchen isn't even officially done as we are still waiting on the pocket door because the glass broke as it was being shipped to us. At least they didn't send it broken I guess!

Anyway, here are some photos and if anyone has any questions, please don't hesitate to ask.

I also want to say thank you to Direct Buy and the wonderful,  patient associates they have. They really helped with so many decisions. A special thank you to MC Designs and Mangino Home Improvements!


 These pictures are in order if you were to rotate to the right. The first couple I took were a little dark. Sorry!  But the darkness shows off my pendant lights that I love!
 We decided to do away with the dining room and added a desk area for more organization and a tv with be mounted on the wall where the blue tape is now. The cabinets are maple buttercream with a bronze glaze and the dark wood is cherry.  The countertops are HIMACS solid surface. Brown tile floor from Daltile.  High Tea (dark) and Toasted Pine Nut paint by Sherwin Williams.
We also made the choice to do away with our microwave. We put a large toaster oven in ( above the oven) that we love. It's The Smart Oven by Breville.
The doorway there leads into the bedrooms. My chalkboard that I got at Marshalls. Fun, fun, fun!!

That doorway is where the pocket door will be if we ever get it. That leads to the garage and basement.

So, that's about all for now. I may come back with some close ups and detail shots next week. If anyone would like to see anything in particular, let me know!!   So happy it's done!!!!!

Thursday, November 7, 2013

MIM #139: Stamped Square Frames

So, here's a quick card I made for a much loved friend of mine for a wonderful birthday gift she made for me. I decided to use the technique that Dawn shows us in this weeks' MIM over at The Papertrey
Ink Blog.  This is what I came up with:

 Since this was a clean and simple card, I decided to add a little to the inside from a negative scrap just waiting to be used for something.
I also stamped the front of the envelope.

Stop back and see me soon.


Monday, October 21, 2013

Make It Monday # 136: Textured Stamping

The letters are done using MIM technique: Textured Stamping. I love the look of this but never think to do it. Here is a close up too:


The Papertrey Ink products I used were the Star border and Enchanted Evening ink. The title was stamped with a Close To My Heart set that I finally broke out to use for the first time. This is a double page LO but I only showed the one side for the technique. Hope you all have a great day!!

Thursday, October 17, 2013

Halloween Chalkboard Sign

Just had to post this chalkboard sign I did today. I didn't think it was too bad for my first!

One of my sneak peek pictures is the corner of this chalkboard!

c-ya!

Kitchen Sneak Peek

Hello Everyone,

I know it's been forever! I am happy to say that things are getting back to normal here at the Seth Residence. Back to our school routine, along with swim, girl scouts and band practice. I am happy to report our kitchen is 95% done. We are waiting on a pocket door and we'll have to do some trim work and finish up with the hardware. In the mean time, I'd like to give you a little peek if you haven't stopped over yet.

                            This is a portion of one my very favorite things in my kitchen.


So, that's all you get for now.  We'd love to see you if you want to stop and see it for yourself. Otherwise, you'll just have to wait for the follow up post when the pocket door is installed.

Sunday, August 25, 2013

Sugar Coated Challenge

I started making a card and ended up with a bookmark. Love the prisma glitter. I will definitely try the tips that Betsy had on keeping the glitter on the paper. Thanks Betsy!! Here it is:


Limited Supplies Challenge

I decided to keep it clean and simple. I stuck with aqua mist and did use the 1 inch strip of gray. I really liked how the retro background came out though!

Rolled Dough Designs

This challenge was fun. I will use this technique again. I just have to think ahead! Sorry about the blurry photo.


What a Mess

Still working and a big mess to clean up!! Well worth it!!

Gallon, Quart & Pint Challenge

Here is my card for the Gallon, Quart & Pint Challenge. Betsy did a great job with this tutorial!

Stamp-a-Faire Challenges

Here is my scent-sationable tag that I made with fudge pudding mix for my kiss. I wanted to keep it clean and simple and the kiss sure smells good!!

I love the way this card came out. It was my favorite by far.  I water colored with re-inkers and then used the course salt like Nichole did to get the effect. I then used watermark ink to stamp the snowflakes and embossed them with clear embossing powder. Embellies and I was done.

This was my oven baked challenge that I made using Wishing You... and the shrinky dink matte film.
I had a little trouble making it around my mascara but I guess I need some practice. I will try this again!!

August Papertrey Ink Blog Hop


I think it's quite obvious which sketch and color scheme I chose. I did have to substitute lemon tart for Harvest gold because I didn't have any. That'll have to make it into my cart soon I guess. 

Have fun and thanks for hopping over!


Saturday, August 24, 2013

Making Mists

So, I wasn't to sure if I liked the results of this card but it is growing on me. I decided to distress the edges as it seemed old and worn. In the end I added the shadow to the sentiment because you couldn't see the Merci very well. Anyway, here it is:

Thanks for stopping!

Jen

Tea Staining Technique

This was fun!! I tea stained some lace I had and I love the look!

See you soon!

Jen

SAF: Bake and Take

Good Morning. I am so excited to be participating in this years Stamp-A-Faire by Papertrey Ink that you can find here.  I completed this mornings Bake and Take by making a much needed birthday card for my big sis. Hope you all like it. Any questions on what I used, don't hesitate to ask. Just to save time, I don't think I'll list everything today. Have fun everyone!!


Stamp A Faire: Meet and Greet

I am looking so forward to tomorrow. My kitchen is down to the studs right now so it will be a bit inconvenient. I don't mind a little extra exercise to the basement for water and whatever else I might need while I play along for an ENTIRE day of crafting!!

Here's a picture of my "baby" Jade that you all saw last year as a puppy. She's a bit too tired to whisk up anything tonight! Have fun everyone!!!